Share brochures, files and logos
Audience: operators · Scope: the Brochures, Powerpoints, Logos and Resources screens · Last reviewed: 2026-07-20
What this does — Puts a downloadable file in front of the right people: a brochure on a product page, a PowerPoint or logo in the agents' Sales Tools, or a policy document in the agents' Resources list. They're four separate screens, but they all work the same way — upload a file, say who may have it.
Before you start
- Be signed in — see Log in to the admin area.
- Decide who should see it. Most of these screens have an Allowed Customer Groups field; if you leave it empty, nobody gets the file. See customer groups.
- Have the file ready as a PDF (or PPT for a presentation, an image for a logo).
Brochures
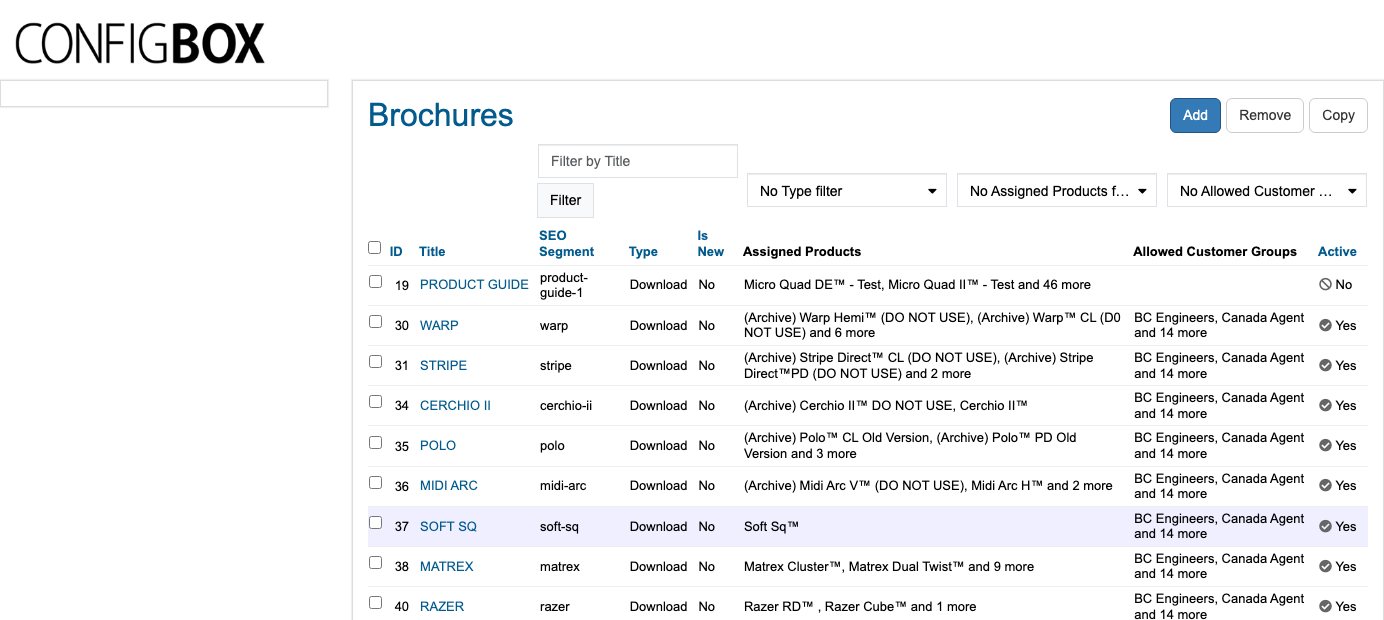
Brochures are the most visible of the four. A brochure shows up in three places: its own public page at
/brochures/<SEO Segment>, the Assigned Brochures block at the bottom of the products it's linked to, and
the agents' Sales Tools.
- Click Brochures in the menu, then Add (or open an existing one).
- Fill in:
- Title (required) — as customers will see it.
- SEO Segment (required) — the end of the web address, e.g.
warpgives/brochures/warp. Use lowercase words with hyphens. - Cover image (required) — the thumbnail shown with the brochure on a product page.
- Type — Download (a file people can download) or Print (a printed brochure they can request). Printed brochures appear only in Sales Tools.
- Brochure — the PDF itself. This appears once Type is set to Download.
- Assigned Products — the products this brochure should appear on.
- Allowed Customer Groups — who may see it.
- Active — the on/off switch. Is New flags it as new.
- Click Save.
Powerpoints
Sales presentations for agents, listed on Sales Tools.
- Click Powerpoints, then Add.
- Fill in the Title (required), upload the Powerpoint file, tick the Allowed Customer Groups, and set Active.
- Click Save.
Assigned Products exists on this screen too, but it's for your own reference — it doesn't change where the presentation appears.
Logos
The Beta-Calco logo files agents download for their own documents, shown on Sales Tools.
- Click Logos, then Add.
- Give it a Title that says which version it is (the list is full of near-identical names, so "Beta Calco Logo & Name (png)" beats "logo4"), upload the Logo file, and set Active.
- Click Save.
Logos are not restricted by customer group — any signed-in agent who can reach Sales Tools gets all of the active ones.
Resources (General Info and Forms)
The agents' Resources page has two sections, each fed by its own screen:
- Resources General → the General Info section (warranty, agency policy, terms of sale, order-entry procedures, holiday closures…).
- Resources Forms → the Forms section (the warranty form and similar).
Both screens have identical fields:
- Click Resources General (or Resources Forms), then Add.
- Fill in the Title (required), then choose the Type:
- DOWNLOAD — upload the file in the Resource field.
- URL — put the web address in Resource URL instead.
- Set the Ordering to place it in the list, and Save.
What happens next
- Brochures appear on their assigned product pages and at their own web address as soon as they're Active.
- Powerpoints, logos and resources appear in the agents' areas on their next page load.
- People outside the allowed groups simply don't see the item — they get no error, it just isn't there.
Good to know
- Empty Allowed Customer Groups means nobody. This is the single most common reason a newly uploaded file "doesn't appear". Tick the groups.
- Resources and Sales Tools are agents-only. A specifier account will see an "agents only" note instead of the list. That's controlled by Group members are BC-Agents on their customer group.
- Changing a brochure's SEO Segment changes its web address — any link already shared will stop working. Set it once, at creation.
- Replacing a file keeps the same entry — use the Replace file control rather than creating a second brochure, so existing links keep working. See Image and file fields.
- Type = Print hides it from the product page. If a brochure has vanished from a product, check whether its Type was switched to Print.
Troubleshooting
- An agent can't see a new brochure. Check, in order: Active is Yes, their group is ticked under Allowed Customer Groups, and (for product pages) the product is listed under Assigned Products.
- The brochure page shows nothing at its web address. The SEO Segment probably doesn't match the link being used.
Screens and labels can differ slightly between environments — if a label doesn't match what you see, check with your Beta-Calco contact.