Manage the smaller content lists
Audience: operators · Scope: the short admin lists that feed icons, tags and small page sections · Last reviewed: 2026-07-20
What this does — Beyond the big content screens (homepage, news, projects, designers) the menu holds a row of short lists. Each one feeds a small, specific part of the site: an icon strip, a dropdown, a carousel. They're all ordinary list screens, so once you know one you know them all — this article says what each one actually feeds, so you can find the right screen quickly.
Before you start
- Be signed in — see Log in to the admin area.
- These all behave the same: Add to create, click a row to edit, Save when done, drag the handle to re-order. See Add, edit and remove items and Fill in an item's details.
What each list feeds
| Menu entry | What it feeds |
|---|---|
| Industries | The Industry classification on project showcases, and the industry filter on the public Projects gallery |
| Industry Icons | The small icon strip on a product page and on its spec sheet PDF (assigned per product) |
| Approvals | The certification/approval logos on a product page and its spec sheet PDF (assigned per product) |
| Diagrams | The dimensional drawings on a product page, the Dimensional Diagrams PDF, and the spec sheet PDF |
| Contact Cards | The digital business-card pages at /contact-cards/<name> |
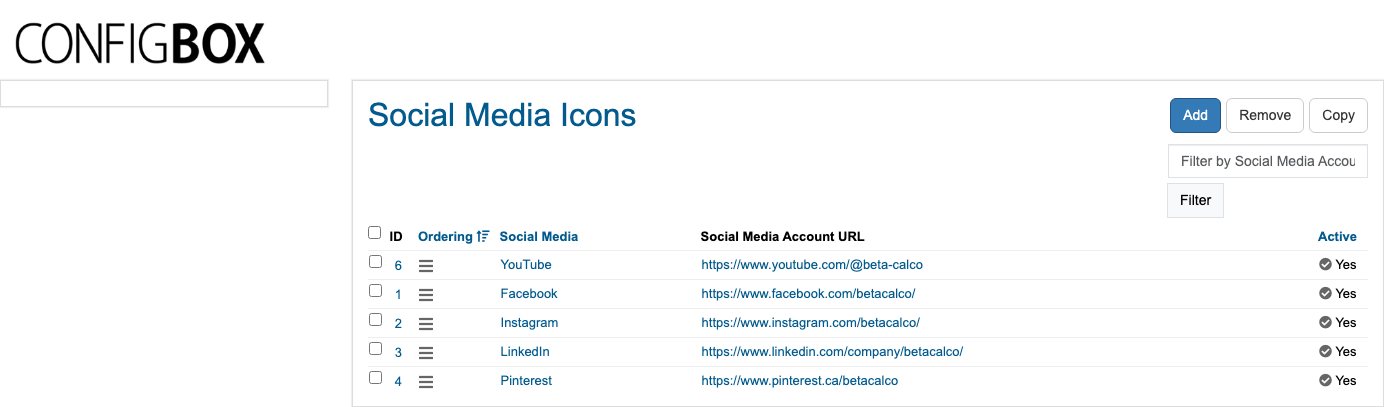
| Social Media | The social icon strip in the site header and footer |
| Testimonials | The testimonial carousel that can be placed on any page |
| Innovations | A tagging list on products — it isn't rendered on the public site today |
| Specifier Types | A classification list that isn't used on the public site today |
| About us | The About Us page — its text, photo, and the team members slider |
Icon lists — Industry Icons, Approvals, Mountings
These three work identically: each entry is a Title plus an image, and products are linked to them on the product edit screen (the Industry Icons, Approval Images and Mounting Icons fields).
- Click the list in the menu, then Add.
- Enter the Title and upload the image.
- Set the Ordering and click Save.
- Open the products that should show it and tick it in the matching field.
Upload high-resolution images. These are printed into the spec sheet PDF, not just shown on screen — the guidance on the screen itself is that about 1000px of height fills roughly a quarter of the PDF page.
Diagrams (dimensional drawings)
Diagrams are per-product technical drawings.
- Click Diagrams, then Add.
- Fill in the Internal Name (required — this is what you'll search for in the admin), an optional Title shown to customers, upload the Diagram Image, and pick the Product it belongs to.
- Optionally restrict it with Allowed Customer Groups, set Active, and Save.
Unlike the icon lists, a diagram points at one product from its own screen — you don't assign it from the product side.
Contact Cards
Each card is a shareable digital business card with its own web address, e.g.
/contact-cards/jane-smith.
- Click Contact Cards, then Add.
- Fill in the SEF Segment (required — the end of the web address), First Name, Last Name (required), and upload the Image.
- Add whatever the person wants shown: Middle Names, Position, Company, Tag Line, Email, Phone, Location, URL Google Maps (turns the location into a map link), URL LinkedIn, and URL Website.
- Click Save — the edit screen shows the live link to the finished card.
Social Media
The icon strip linking to Beta-Calco's social accounts, shown in the site header and footer.
- Click Social Media, then Add.
- Fill in the Social Media name (required — YouTube, LinkedIn, …) and the Social Media Account URL
(required — the full address, including
https://). - Upload both the Image and the Hover Image — the second is what shows when someone points at the icon, so the pair should match in size.
- Set the Ordering and Active, then Save.
Testimonials
The quote carousel that Beta-Calco drops onto marketing pages.
- Click Testimonials, then Add.
- Fill in the Internal Name (required, admin-only), upload the Logo Image of the customer's company, write the Quote, and add the person's Name and Position.
- Upload the Portrait Image, optionally add a URL to social profile (this turns the portrait and name into a link), set the Ordering, and Save.
There are two Testimonials screens. This one is the marketing carousel. The other lives under Career Page → Testimonials and holds employee quotes for the careers page — see Update the career page.
About us
About us is a single record, so the menu entry opens the edit form directly — there's no list.
- Click About us.
- Edit the Description (the page text — required) and the Photo.
- Below that, Team Members is a small grid: each person has a Photo, Name, Role, an optional Department, and an Ordering. Add, edit or reorder them here.
- Click Save.
What happens next
- Changes are live on the next page load — there's no publish step beyond the Active switch where a screen has one.
- Icons and diagrams that feed the spec sheet PDF only reach it when that PDF is regenerated; use Refresh cached specsheet PDF on the product if you need it right away.
Good to know
- An entry with nothing assigned does nothing. Icons, approvals and industries only appear once a product or showcase is linked to them.
- Innovations and Specifier Types don't currently show anywhere on the public site. Keep them tidy if you like, but don't spend time on them expecting a visible result — check with your Beta-Calco contact before building anything on them.
- Internal Name vs Title. Several of these screens have both: the Internal Name is for you (it's what the admin list shows and searches), the Title is what customers read.
- Deleting removes it everywhere. A deleted icon disappears from every product that used it. Deactivate or rename instead when you're unsure.
Screens and labels can differ slightly between environments — if a label doesn't match what you see, check with your Beta-Calco contact.