Update the branch list from the Rep Master sheet
Audience: operators · Scope: the Branches screen and its import · Last reviewed: 2026-07-20
What this does — Branches are the rep offices and agencies that sales agents belong to. Every customer record carries a branch, quotes are attributed to it, and it links through to the matching organisation in the CRM. The list is not typed in by hand — it's imported from the Rep Master Google Sheet, and this article is how you run that import and read the result.
Before you start
- Be signed in — see Log in to the admin area.
- Click Branches in the menu. Notice there's no Add button and no editable rows — this screen is a read-out of the sheet plus an Import button. To change a branch, change the sheet.
- Make your edits in the Rep Master sheet first. Ask your Beta-Calco contact if you don't have access.
What the screen shows
- Regular imported branches — the live list: ID, Name, Code, Discount Groups, and Organisation ID.
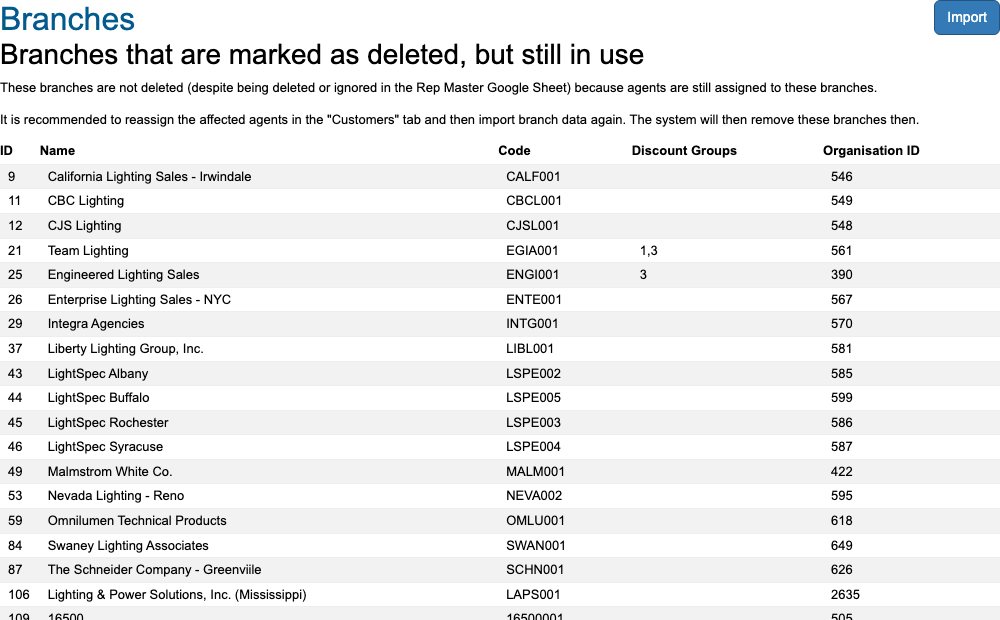
- Branches that are marked as deleted, but still in use — a warning table that only appears when there's something to fix. See clearing it below.
Run the import
- Edit the Rep Master Google Sheet — add a rep office, correct a name, or flag one to be dropped.
- In the admin, click Branches.
- Click Import (top right).
- Wait for the confirmation: "Branches updated."
What happens next
The import matches rows to existing branches on the branch code, then:
- A row whose code is new creates a branch.
- A row whose code already exists updates that branch's name, organisation ID, discount groups, RSM details and win rate.
- A branch that is no longer in the sheet (or is flagged not to sync) is marked for removal — and is then permanently deleted if no customer is assigned to it.
- A branch marked for removal that still has customers on it is kept, and appears in the warning table.
Clear "deleted but still in use"
This warning means the sheet says a branch is gone, but people are still attached to it — so the system kept it rather than orphaning them.
- Open Branch Cleanup (in the menu right under Branches). It lists exactly these people, grouped per deleted branch.
- Reassign them to their new branch there — or disable the accounts that shouldn't have access anymore.
- Come back to Branches and click Import again. The empty branches are now removed and the warning clears.
Good to know
- The sheet is the source of truth. Anything you'd want to change about a branch — its name, code, organisation ID, discount groups, RSM — is changed in the sheet and imported, not typed in the admin.
- The branch code is the identity. Changing a code in the sheet doesn't rename a branch; it creates a new one and retires the old. Only change codes deliberately.
- The import validates before it writes. If the sheet's header row doesn't match the column names configured under Custom Settings → Branches Synchronization, the import stops and tells you which headers it couldn't find — nothing is changed. The same goes for bad data in the rows.
- Nobody is left without a branch. That's the whole point of the warning table — reassign first, import second.
- Branches feed the CRM link. The Organisation ID ties the branch to its organisation in Pipedrive, so a wrong ID sends quotes to the wrong organisation. See Pipedrive.
Troubleshooting
- "Spreadsheet data did not pass validation." Either the header row or the data is off. The message lists the specific problems — fix them in the sheet and import again.
- "Fetching spreadsheet failed." The sheet moved, was renamed, or its sharing changed. Ask your Beta-Calco contact to check the Rep Master Sheet setting.
- A branch you deleted in the sheet is still listed. It still has customers on it — see above.
Screens and labels can differ slightly between environments — if a label doesn't match what you see, check with your Beta-Calco contact.