Fill in an item's details (the edit screen)
Audience: operators · Scope: the shared edit screen used across the admin area · Last reviewed: 2026-07-12
What this does — When you Add a new item or open an existing one, you get an edit screen: a form of fields for that item. The fields differ by item type, but a handful of them appear almost everywhere and behave the same way. Learn these once and you can fill in any edit screen with confidence.
Before you start
- You need to be signed in and on an edit screen — from any list, click Add or open an existing item (see Add, edit, copy, or remove items).
Saving your work
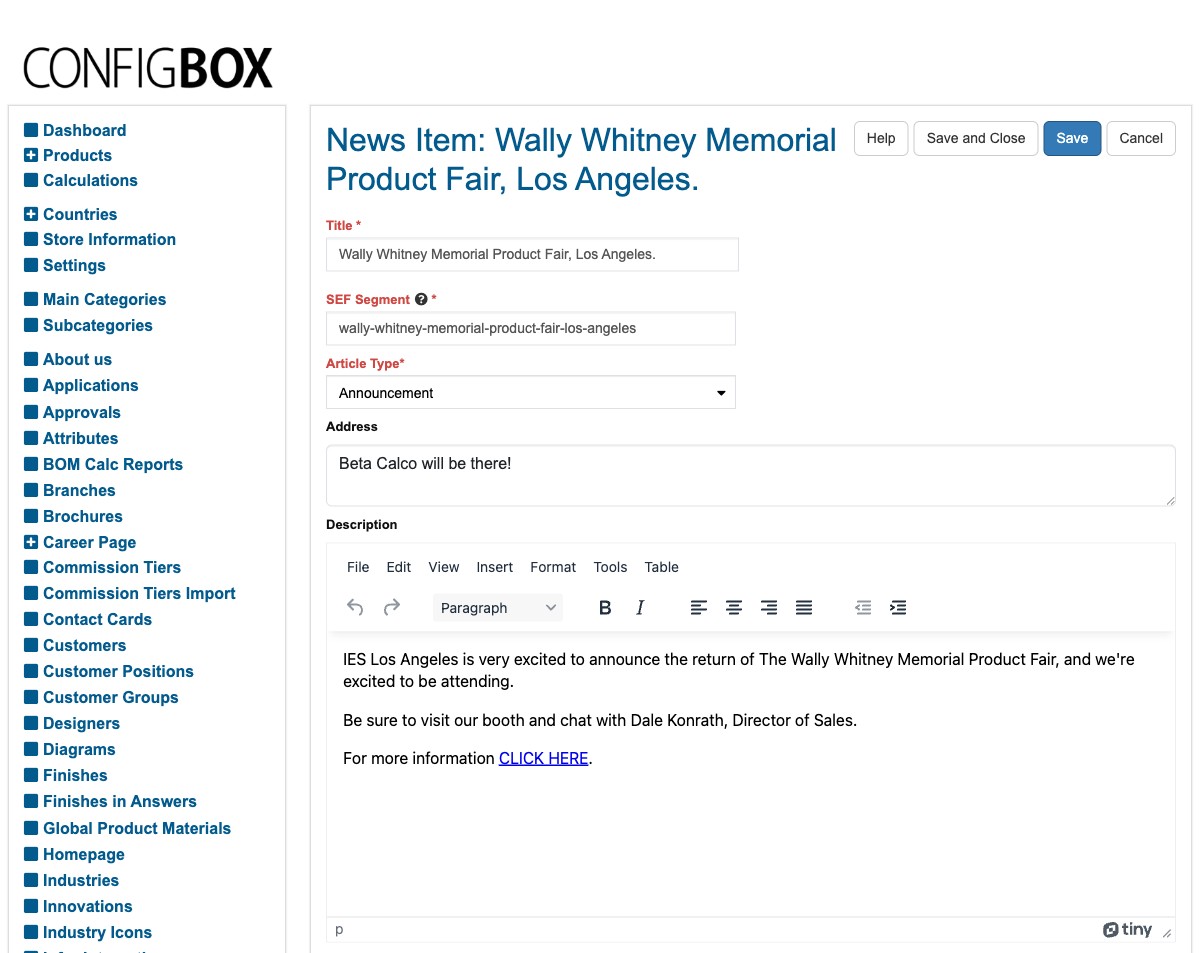
At the top of every edit screen are four buttons:
- Save — saves and keeps the screen open (good for saving as you go).
- Save and Close — saves and returns you to the list.
- Cancel — leaves without saving. Anything unsaved is lost.
- Help — opens the configurator's built-in help.
Nothing you type is saved until you click Save or Save and Close. If you navigate away first, your changes are gone.
Fields you'll see almost everywhere
- Required fields are marked with a red asterisk (*). You can't save until they're filled in — if Save seems to do nothing, look for an empty field flagged with a red asterisk.
- SEF Segment — the short, web-friendly text that becomes part of the page's web address (for example
wally-whitney-memorial-product-fair). Use lowercase words with hyphens, no spaces. It's filled in from the title for you; keep it stable once a page is live, so existing links don't break. - A rich-text box (for descriptions/body text) — a small word-processor with Bold, italic, alignment, links, and so on. When pasting from Word or a web page, paste as plain text where you can, to avoid dragging in messy hidden formatting.
- Dropdowns — pick one option from a fixed list (for example an item's type).
- Date and Sorting Date — click the box to pick a date from the calendar. The Sorting Date controls where the item sits in date-ordered lists (like News), separately from any date shown to visitors.
- Published — a Yes / No choice. Yes = live on the website; No = saved but hidden. Use No for drafts, or to pull something off the site without deleting it.
- Visible for these Groups — a box of tick-able customer groups that decides who can see the item. This one catches people out — see below.
- Image and file fields — for pictures and documents — see below.
Image and file fields
Many items have one or more image or file fields — a picture, a PDF, a diagram. They all work the same way. A field shows either "no file yet" or a line like Current file: with the current file's name, plus:
- a Replace file link (upload a new file in its place), and
- a Delete file at save tick box (remove the current file).
To add or replace a file: click Replace file, choose the file from your computer, then Save — the upload happens on save, not the moment you pick the file. To remove a file: tick Delete file at save, then Save.
Some items have more than one file field for different jobs — for example a main Image and an Image in modal (the larger version shown when a visitor clicks to enlarge). Fill in the ones the item needs.
Changes may not show instantly. After you save, the site (and your browser) can briefly cache the old image or page — refresh the public page, or wait a little. If an old image really won't go away, ask your Beta-Calco contact; the site keeps a cache that occasionally needs clearing.
Visible for these Groups — who sees the item
Many items have a Visible for these Groups box listing customer groups such as Canada Agent, US Specifier, EU Agent, and so on, with a Select All / Deselect All shortcut. Only the ticked groups can see the item.
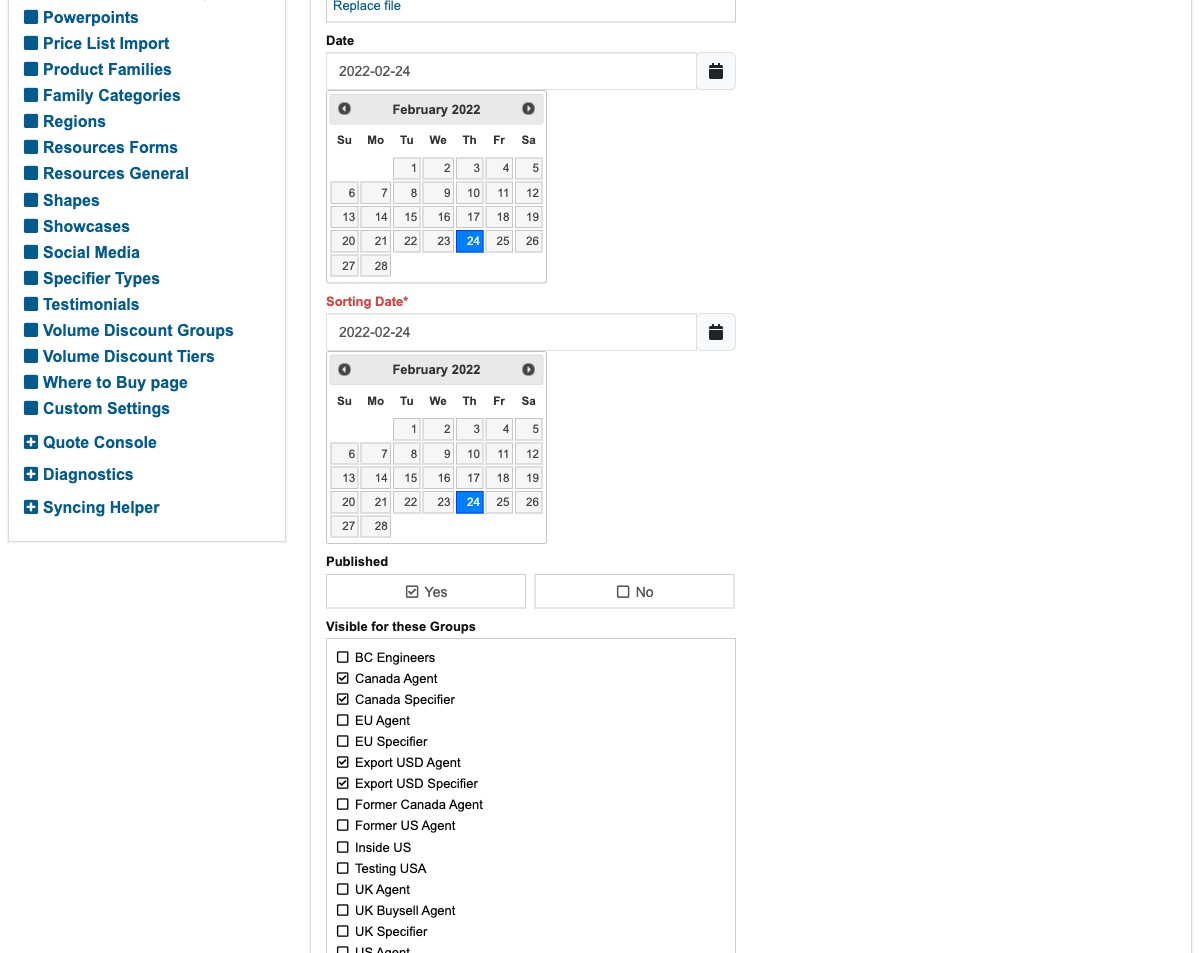
- Tick the groups who should see it. For content everyone should see, use Select All.
- An item with no groups ticked may show to no one — if something you published isn't appearing, this is the first thing to check.
- Groups usually reflect who the visitor is (a sales agent vs. a specifier) and where (Canada, US, EU, UK). When in doubt about which groups to tick, ask your Beta-Calco contact — showing the wrong region's content is easy to do here.
What happens next
- After you Save, the change is stored. If the item is Published: Yes and the right groups are ticked, it's live for those visitors right away (you may need to refresh the public page).
- Save and Close returns you to the list, where your item now reflects the new values.
Good to know
- Save early, save often. Long forms are easier to recover if you Save partway through.
- Draft first. Set Published: No while you build an item, then flip it to Yes when it's ready.
- The red asterisk is your checklist — if Save seems to do nothing, a required field is probably empty; scroll up to find the one flagged.
Troubleshooting
- Save doesn't seem to work / the page won't close. A required field (red *) is likely missing or invalid. Fill it in and try again.
- The item saved but isn't on the website. Check Published: Yes and the Visible for these Groups ticks — see above.
- An old image is still showing. It's almost certainly a cache — refresh the page, or try again shortly.
Screens and labels can differ slightly between environments — if a label doesn't match what you see, check with your Beta-Calco contact.